How to integrate
hom3r is designed to work in a web browser
This website is in the process of being updated, the information displayed may not be up to date.
hom3r is designed to work in a web browser. Its architecture intends to simplify its integration
into any web-based application while ensuring compatibility with most web browsers. To achieve
both goals, hom3r consists of a 3D canvas and a Javascript API (see Figure 1).
The 3D
canvas provides the interactive 3D rendering of product geometry, manages user interaction and
presents visual information, received from the web application, over the 3D geometry. This
module has been implemented using the videogame development platform Unity 3D, version 5 Pro,
and built as WebGL for its integration in web applications.
The JavaScript API is
responsible of loading the 3D Canvas and implementing the interface which allows information
exchange between the 3D Canvas and the web application. This API consists of a set of JavaScript
files with all interfaces and implementations.
More details follow in the remainder of this section.
How to integrate hom3r in your web application
The functions for loading the 3D canvas are based in the templates and examples provided by Unity 3D. The API of hom3r, which will be described in the next section, has been implemented as a JavaScript container. The container is similar to a class where all needed methods and attributes have been implemented. These methods allow communication with the 3D canvas, adapting data types when needed. The API allows the web application to register a callback function through which the different events launched during 3D interaction will be reported to the web application.
To make use of the API, the script Hom3rAPI.js should be included by the web application through the appropriate HTML code. From that moment on, the web application can access the methods provided by the API by using the prefix “Hom3rAPI”. For example, to register the function MyCallbackFunction, the web application should call: Hom3rAPI.RegisterCallBack (MyCallBackFunction).
Besides the script containing the API, the web application should integrate as well the rest of scripts containing the code allowing the load of the 3D canvas. This is the list of required scripts:
- Hom3rAPI.js: Contains the JavaScript API allowing communication with the 3D Canvas.
- UnityConfigModule.js: Configures the parameters needed for loading the 3D Canvas, including the location of the files containing the code of the hom3r and the amount of memory reserved for execution; this parameter should be adjusted depending on the weight of the 3D models. This script is also responsible of checking potential compatibility issues with the browser and of exception handling when needed.
- UnityProgress.js: Contains the code for showing the splash screen and the progress bar while loading the 3D Canvas (WebGL canvas generated by Unity). This script can be adapted to customize the splash screen appearance.
- UnityLoader.js: Contains the Unity WebGL loader.
The steps for integrating hom3r in any web application are:
1. Include the JavaScript files in the HMTL code:
			<script src="~/Hom3r/Hom3rAPI.js"> </script>

			<script src="~/Hom3r/UnityConfigModule.js"> </script>

			<script src="~/Hom3r/ProgressBar/UnityProgress.js"> </script>

			<script src="~/Hom3r/Release/UnityLoader.js"> </script>
2. Add the 3D Canvas in the place of your HTML code where you want it to appear:
			<div id="hom3rwebgl">

			<canvas class="emscripten" id="canvas" oncontextmenu="event.preventDefault()"> </canvas>

			</div>
The following is an example of the HTML code of a simple web page including hom3r:
			<!doctype html>

			<html lang="en-us">

			<head>

			<meta charset="utf-8">

			<meta http-equiv="Content-Type" content="text/html; charset=utf-8">

			<title> hom3r example </title>

			</head>

			<body>

			<h3> home3r example </h3 >

			<div id="hom3rwebgl" >

			<canvas class="emscripten" id="canvas" oncontextmenu="event.preventDefault()" height="700px" width="900px"></canvas>

			</div >

			<script src="Hom3rAPI.js" > </script >

			<script src="UnityConfigModule.js" > </script >

			<script src="ProgressBar/UnityProgress.js" > </script >

			<script src="Release/UnityLoader.js" > </script >

			</body >

			</html >
hom3r API
This section defines the interface (API) that hom3r provides to web applications, with the goal of providing integration of the 3D Canvas with the web application and allowing information exchange between both. The API methods can be grouped in: (1) methods used by the web application to send information to hom3r (input interface) and (2) methods used by the web application to receive information from hom3r (callbacks).
The API is detailed in the following documentation: hom3r API english version and hom3r API spanish version. As a summary, the hom3r API is presented in the following diagram Figure 2.
The methods presented in the API allows the application to, for instance, load the product model from a specific URL, select or deselect a part of the product model, add/remove a 3D label with information over a part of the product model or activate/deactivate any of the occlusion management mechanisms. On the other hand, communication from hom3r to the web application is done through a callback function.
The following is an example of message exchange between web application and hom3r during user interaction.
Main scenario example: Interaction
In this scenario message exchange is bidirectional; the web application sends commands to hom3r using the methods defined in the API and hom3r sends messages to the web application through the registered callback. The following diagram shows an example of message exchange between hom3r and the web application during user interaction.
The diagram shows an example of message exchange during user interaction. The sequence of messages could be completely different depending on user interaction and the diagrams shows only a few of the many possible messages. In this example, the user selects through 3D interaction (using the mouse) a part with identifier 121212. Hom3r then shows the part highlighted in the 3D Canvas and reports this event to the web application through the registered callback. The web application then sends a command (2. SmartTransparency) to hom3r to activate the smart transparency occlusion handling technique, so that hom3r makes the part visible through occluding parts in the 3D render. After a while, the web application tells hom3r to attach a label (3. ShowLabel) to the selected part, with identifier 121212, in a specific local position with text “non-acceptable flaw”. To conclude the example, the user clear the selection of parts and hom3r reports the event to the web application through the registered callback.
How to create the product model
The product model supported by HOM3R is shown in Figure
4 (it is based on [Rey13]), and consists of a tree structure where each node of the tree
represents a part or an area within one part. A node leaf represents a semantically atomic part
of the product, while product nodes allow to organise these node leafs and, therefore, give the
product its hierarchical structure. Areas, on the other hand, are the different areas which
shape any of the product parts. In such way that, in the model geometry information is linked
only to the areas.
Having 3D transform data for each area allows for reusing the same 3D mesh files for geometries
that are repeated frequently within the product, such as screws. Each node of the tree has
associated data, including assembly information (used in the exploded views) or other relevant
data.
All the hom3r features are based on the product model definition. For example, selection feature allows the user to highlight a specific node (part or area) or a set of nodes (by a mouse click). Also, it allows the selection of a product part at any hierarchy level, which results in the automatic selection of all nodes that are children of the current selection.
Product model JSON file structure
Hom3r loads the product model from a JSON file, through the LoadProduct method of the interface (see the API document). The structure of this JSON is formed by three different blocks (1) productNode, (2) areaNode and (3) productNodeGeometry (see the example below).
- The productNode block shows all nodes and leaf nodes of the product. To
do that, this block is composed of different rows any of them form by five different
fields:
- id is a string parameter which represents the ID of the node. This ID
has to be unique in the product model.
- parent is a string parameter which represents the ID of the parent node
of this node. It must take the value of “#” if this node is the root
of the product tree.
- text is a string parameter that contains the name of the node.
- type is a string parameter which indicates if the product node is a
leaf or a node. A leaf node is the lowest node of the product nodes, in such way
that its kids are only areas and its parents normal model.
- special_node is a string parameter which indicate if the node has a special relevant in the hierarchical structure. hom3r will allow to do selection of these special nodes. There can only be one special node in each branch of a tree.
- id is a string parameter which represents the ID of the node. This ID
has to be unique in the product model.
- The areaNode block shows all areas of the product. To do that, this
block is composed of different rows any of them form by four different fields.
- id is a string parameter which represents the ID of the area. This ID
has to be unique in the product model.
- parent is a string parameter which represents the ID of the parent
node of this node. Only a node can be parent of an area, this is, one of the
nodes shown in the productNode block.
- description is a string parameter that contains the name/description
of the area.
- meshname is a string parameter which indicate the name of the mesh into the 3D geometric file.
- id is a string parameter which represents the ID of the area. This ID
has to be unique in the product model.
- The productNodeGeometry block lists the different model files that hom3r has to
load in order to get all the areas that has been defined in the product model. This block is
composed of different rows within several fields, namely:
- id is a string which represents the ID of the product node parent of this 3D
geometry file.
- geometryfile is a string field which contains the file url that hom3r will used
to download the file.
- gemetryfiletype is a string field which contains the format of the file to
download (OBJ, BLENDER, Unity ASSETBUNDLE, etc). Currently, hom3r only support load
geometry from Unity assetbundle files, read How to import a 3D model section down below.
But is planning to support load geometry from OBJ files soon.
- version is an integer parameter which indicate the geometry file version.
- geometryname is a string parameter that indicate the geometry name inside a
Unity assetbundle geometry file.
- active is a Boolean parameter which indicate if this geometry file has to be
loaded or not by hom3r.
- position_[x .. z] these are three float parameters which indicate where hom3r
is going to the position the geometry loaded in the global scene. These parameters are
the coordinates in the global scene.
- rotation_[w..z] these are four float parameters which indicate the rotation
that hom3r is going to applied to the geometry loaded in the global scene.
- id is a string which represents the ID of the product node parent of this 3D
geometry file.
Here below it's showed an example of a product model JSON file.
			{"productNode": [
{"id":"1","parent":"#","text":"Saturn V","type":"node","special_node":false},
{"id":"1.1","parent":"1","text":"First Stage","type":"node","special_node":true},
...
{"id":"1.4.2","parent":"1.4","text":"LES","type":"leaf","special_node":false}
],
"areaNode": [
{"id":"1.1.1.1","parent":"1.1.1","description":"F1-AuxPumps","meshname":"F1-AuxPumps"},
{"id":"1.1.1.2","parent":"1.1.1","description":"F1-CombustionChamber","meshname":"F1-CombustionChamber"},
...
{"id":"1.4.2.6","parent":"1.4.2","description":"LES-Tower","meshname":"LES-Tower"}
],
"productNodeGeometry": [
{"id":"1","geometryfile":"model/saturn5.hom3r","geometryfiletype":"assetbundle","version":1,"geometryname":"Saturn V","active":true,"position_x":0,"position_y":0,"position_z":0,"rotation_w":0.7,"rotation_x":0,"rotation_y":0.7,"rotation_z":0}
]}
Product model JSON file structure
This JSON file can be generated dynamically by the web application, when it is required by hom3r, or just can be store it statically. In order to facilitate the use of homer, we also provide an excel file which allow you to generate a JSON of your model, after fill in the excel file correctly.
In this excel file, product_model_JSON_generator.xlsm, you should fill the “Introduce data” and the “ProductNodeGeometry” sheet. And, after that, pressing the “Create Json file” button you will get a JSON file ready to be loaded by hom3r.
These “Introduce data” sheet will store the product model completely, and is form by six fields:
- id is a string parameter which represents the ID of the node/area. This ID has to be unique in the product model.
- parent is a string parameter which represents the ID of the parent node of this node. It must take the value of “#” if this node is the root of the product tree.
- name is a string parameter that contains the name of the node/area.
- type is a string parameter which indicates if the product node is a node, a leaf or an area. A leaf node is the lowest node of the product nodes, in such way that its kids are only areas and its parents normal model.
- special_node is a string parameter which indicate if the node has a special relevant in the hierarchical structure. hom3r will allow to do selection of these special nodes. There can only be one special node in each branch of a the model tree.
- meshname is a string parameter which indicate the name of the mesh into the 3D geometric file. This field only can be filled if the node type is an area.
In order to fill the “ProductNodeGeometry” sheet, please, read the productNodeGeometry block in the Product model JSON file structure section, in this web page.
How to import a 3D model
Nowadays hom3r is only capable of load 3D models that come in Unity3D AssetBundle format. We are working to include a OBJ format file loader into hom3r in the near future. But until this happens, you need to load your 3D model into Unity3D and create the AssetBundle file.
Fortunately, the free version of Unity3D is enough to this task. Furthermore, we offer a unity project in order to take this step easier. You just should download this Unity project, import your 3D model into it and finally create the asset bundle. Follow the instruction that we offer in this video.
Once you have the AssetBundle file you should upload to web server and filled the product model correctly. The AssetBundle file name and its path have to match with the file name introduce into the product model, as it is described in the previous section.
Reference
[Rey13] REY J.: Modeling with VSEE, Definition of the Guidelines and Exploitation of the Models. YGT Final Report, Virtual Spacecraft Design Project. European Space Agency, 2013.
Figures
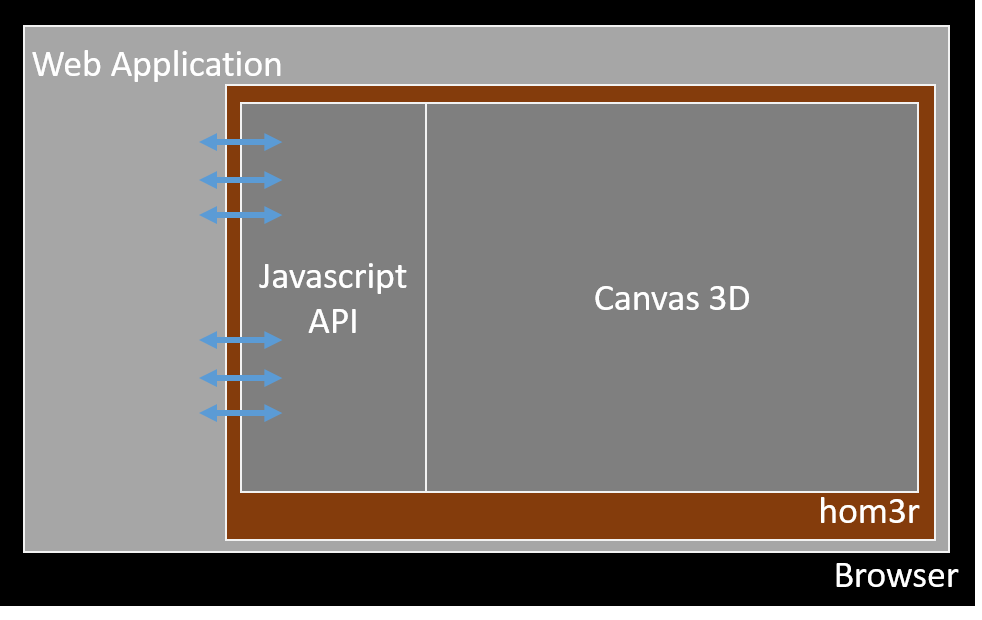
Figure 1. High level architecture block diagram of hom3r.
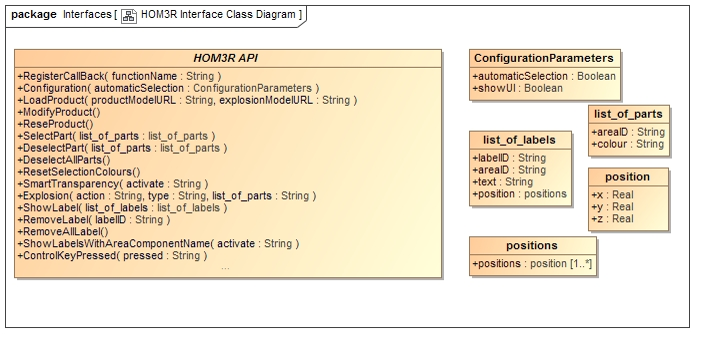
Figure 2. HOM3R API.
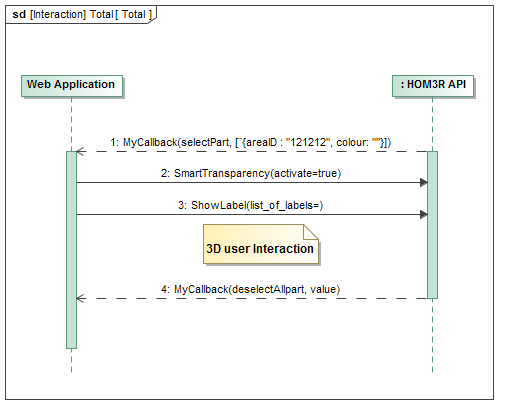
Figure 3. Main scenario example: Interaction.
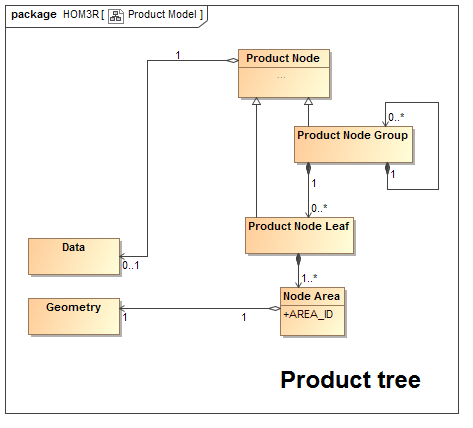
Figure 4. Product model supported by HOM3R.